Mastering Hugin
It’s warm and dry today, but overcast, so I may hike in the neighborhood but will probably not make a full wanderlust of it. Tomorrow I’m scheduled to take Nathan to another smash tournament in Albuquerque, and rain is predicted, so I doubt I’ll do much in that area. Monday is forecast to be mostly sunny, though there may be snow on the ground, but that’s looking like my best time to do some serious hiking. I’m thinking either Guaje Canyon Narrows or Buckman Peak, but either will require a hiking partner. Let me know if you are interested.
Meanwhile, I have been working at mastering the use of Hugin to stitch together panoramas, and I’m starting to be pretty happy with the results. For example, here is the latest stitched version of the panorama in the site header. (Click to get full resolution.)

That’s going to be tough to beat.
So I’ve begun to understand how Hugin works, and found that there are a number of tricks to converting my old panorama shot series. The first really important trick is to correct for vignetting, which it turns out Hugin does not do automatically.
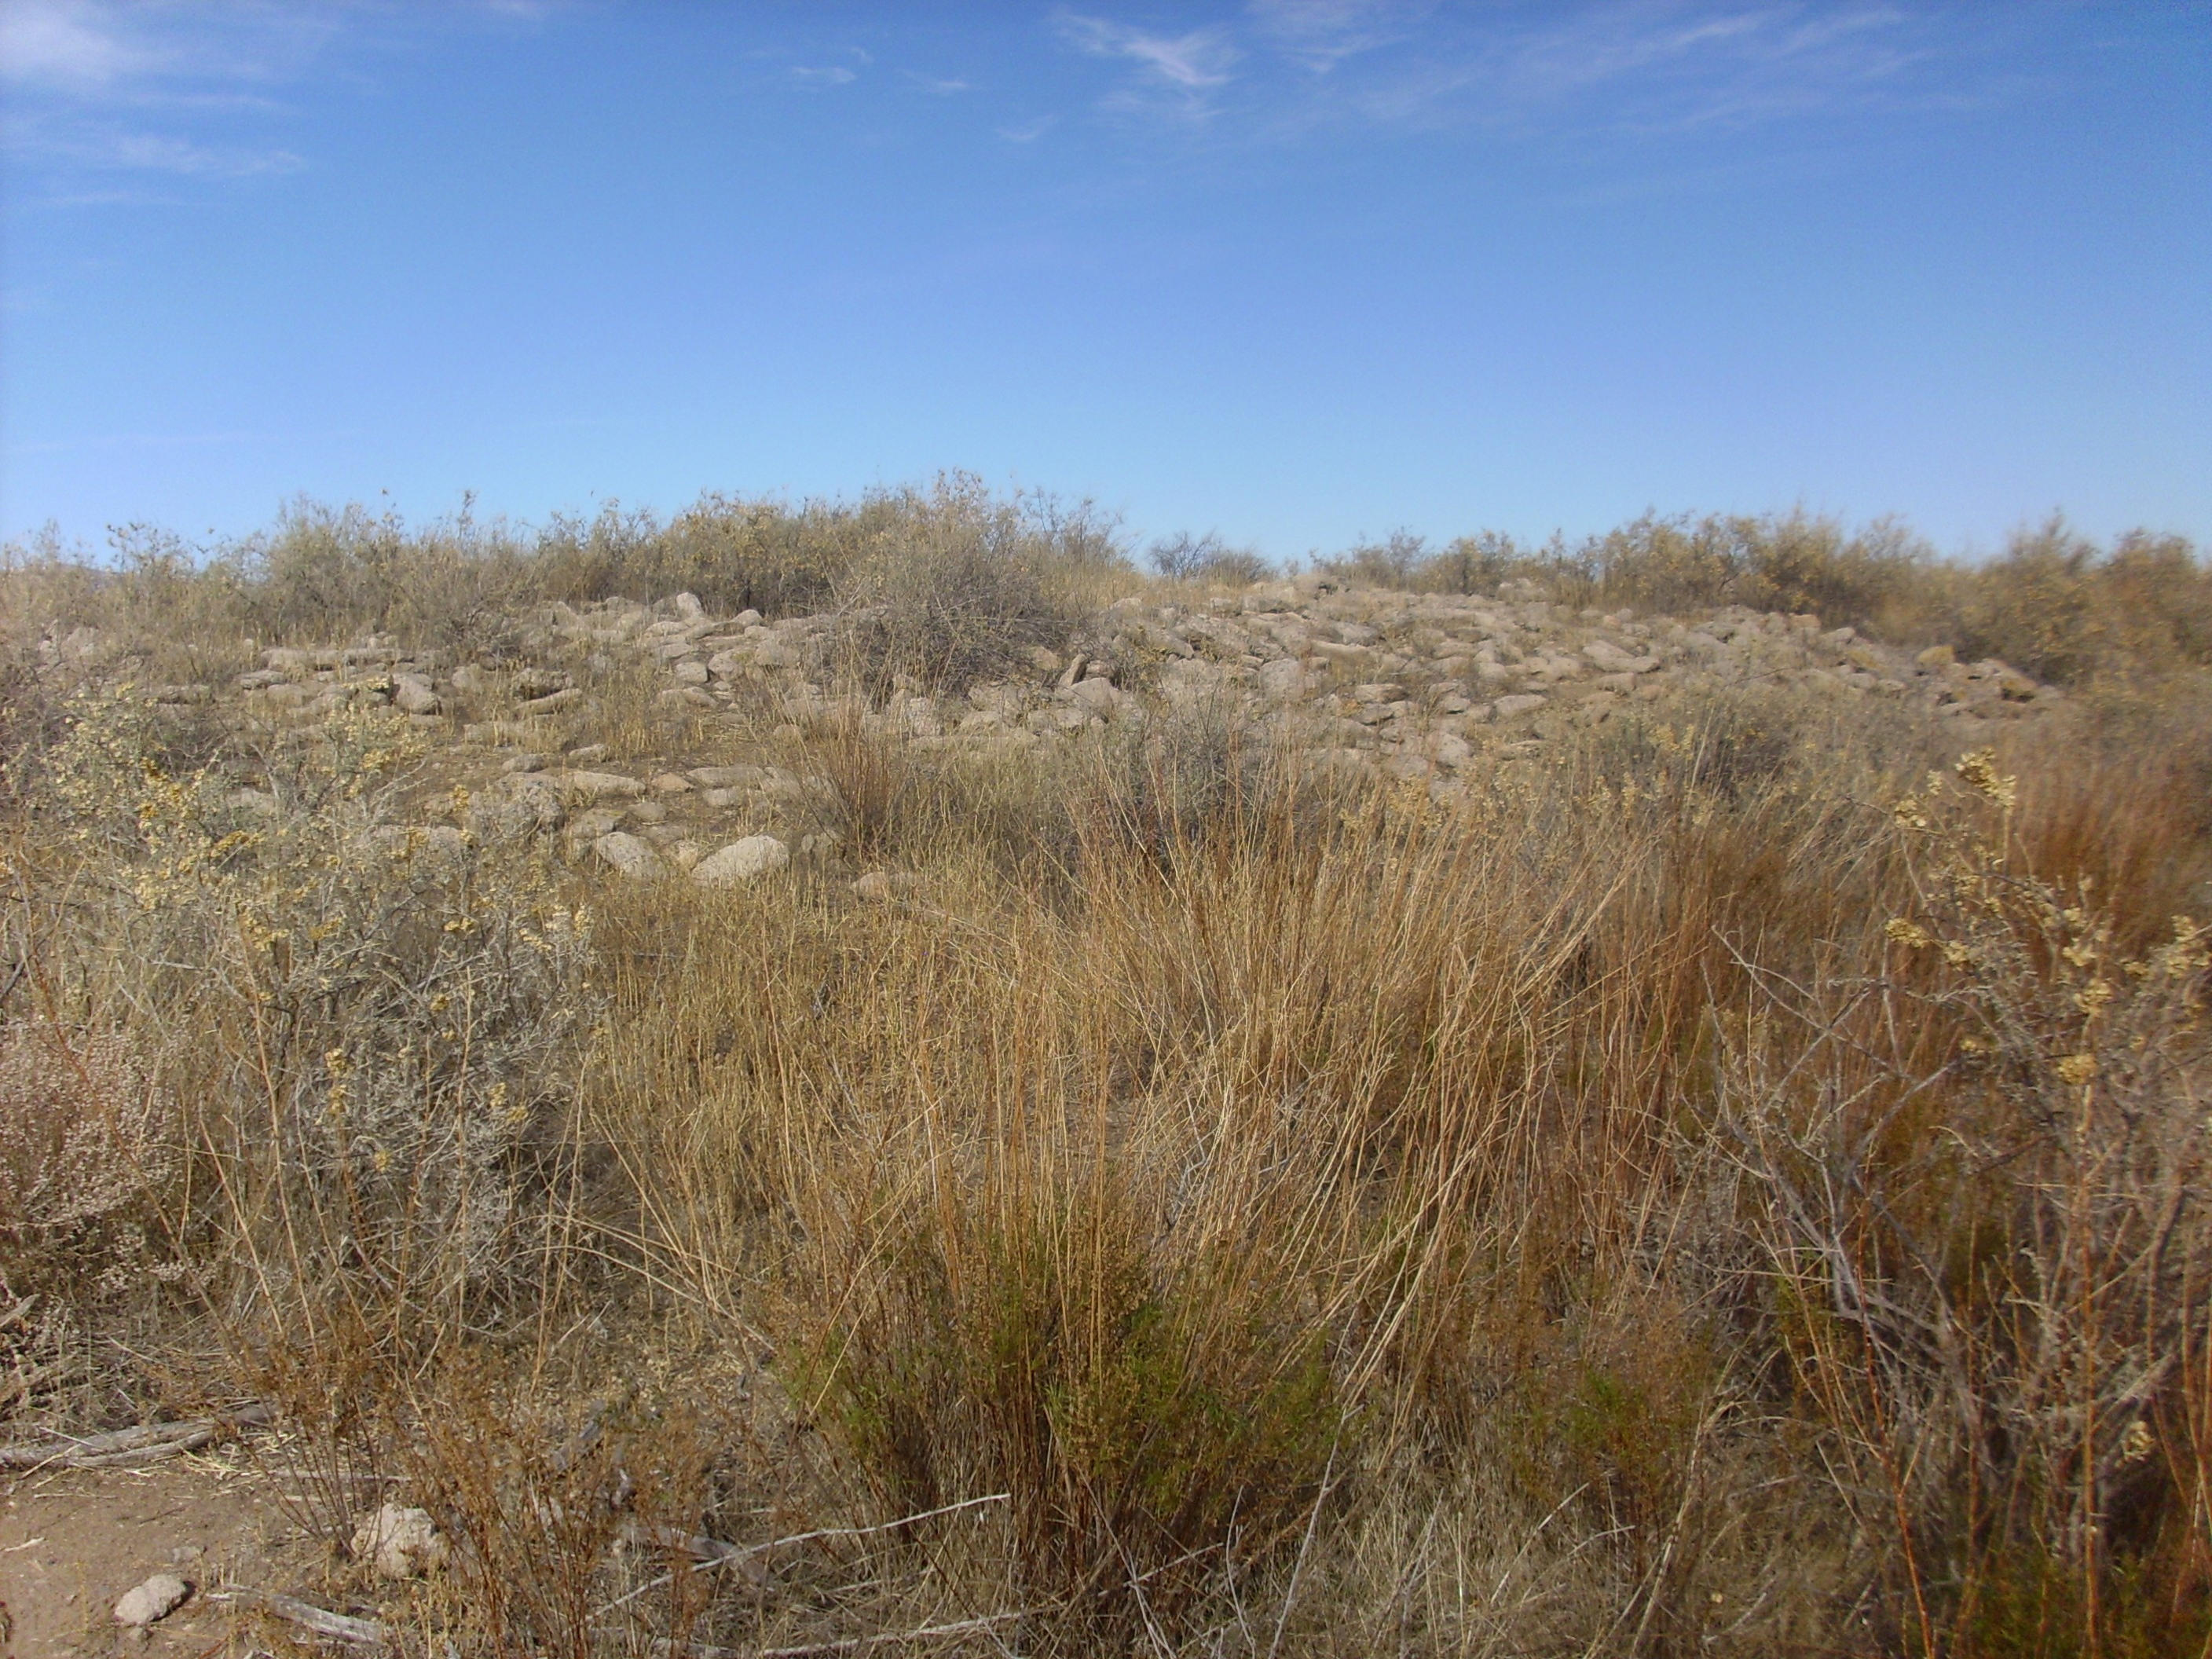
Vignetting is the tendency for the corners of a photograph to look darker than the center. It’s a simple optical property of conventional lenses and, fortunately, it’s fairly well understood. Here’s a raw photograph showing the effect:

The corners of the photograph are noticeably darker than the center. In a single photograph, this is not terribly important, but it becomes more so when we try to stitch photographs together. Hugin actually comes with an image processor that can correct for vignetting, fulla, but it’s not automatically invoked by the GUI. You have to run it by hand with the command:
fulla –vignetting=1.2:-0.8:0:0 image.jpg
The parameters appearing after the –vignetting keyword are coefficients in a polynomial in powers of r2, where r is the distance from the center of the image. You have to determine the coefficients empirically (by trial and error) but the values I’ve adopted here seem quite good for the lens on my old camera. I’ll have to find new coefficients for the new one when I start piecing together panoramas from its images. (Which I do plan to do; more later.)
After vignetting, the previous image becomes
It’s a big improvement when you try to stitch this into a panorama.
When you load an image into Hugin, the software looks to see what the focal length and focal ratio of the camera are. (This is often included as metadata with the image file.) If it can’t find the data, it will ask you for it. My old camera had a focal length of 6.2mm and almost all the old panoramas were taken at a focal ratio of 5.6; yeah, I have that memorized now. Based on these numbers, Hugin calculates your field of view and projects the image onto a sphere centered on the camera location. Of course, photographs aren’t usually displayed on spherical surfaces — not yet, anyway — so Hugin then projects the image onto the plane. You can choose the projects for each step, but the default for the first projection (“Normal (rectilinear)”) is fine for ordinary camera lenses. The choice is dictated by the kind of lens you have. The default for the second projection (“Equirectangular”) also seems to work fine, but you have some meaningful options here and I may play with them at some point.
This is what Hugin shows after loading the first image.
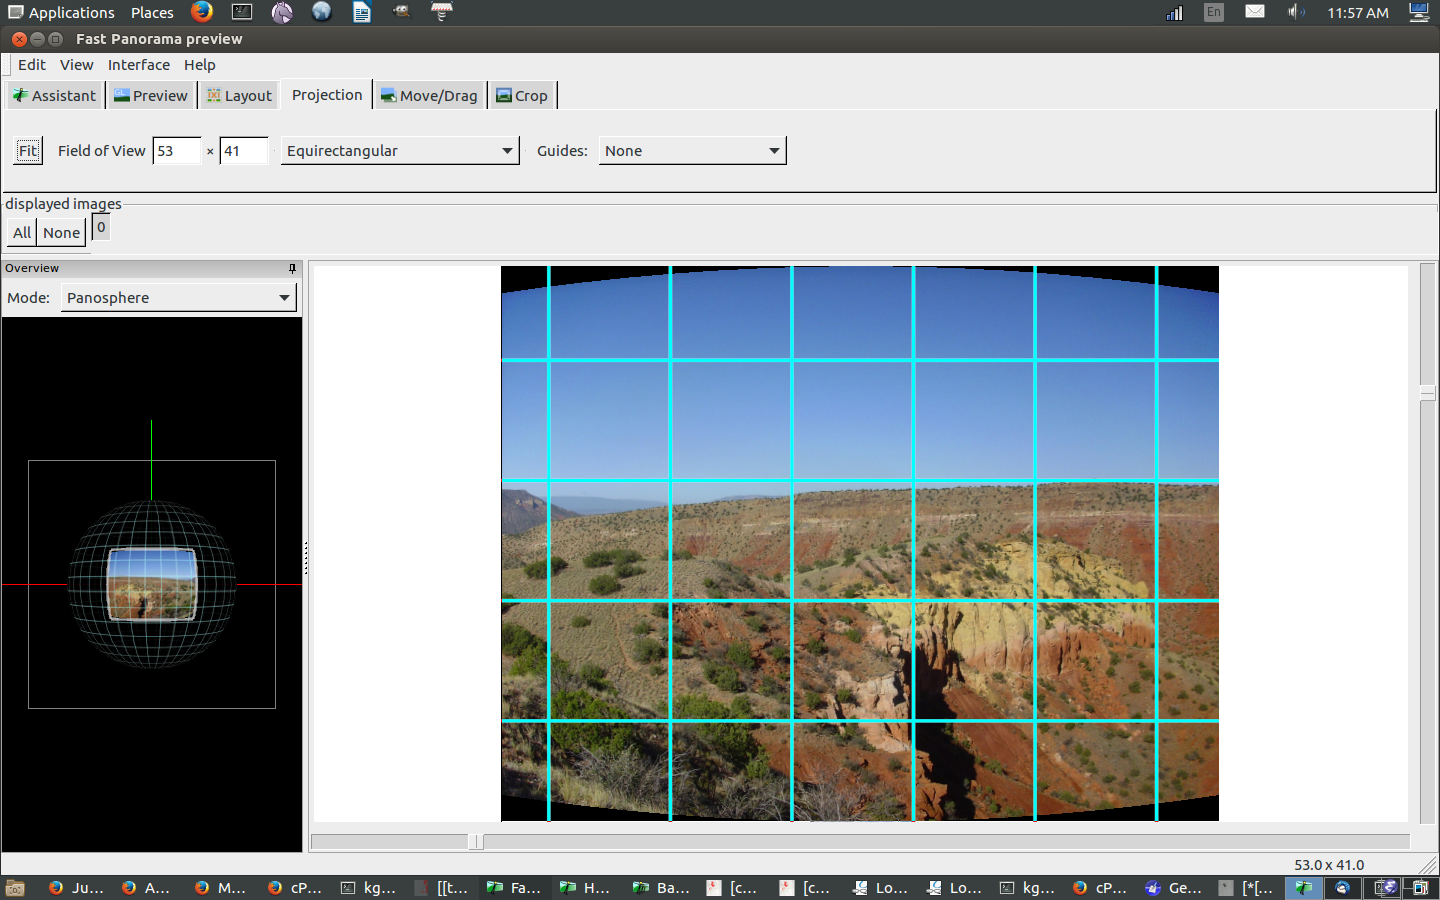
The window on the left shows how the image has been projected onto the sphere. The window at right shows the subsequent projection back onto the plane. Note that the corners of the image have “shrunk”; this is an important correction for allowing adjoining images to line up properly. I crudely accounted for this in my old panoramas, not by remapping the images, but by trimming them so that the overlap point was equally far from the image center for both images. Then, assuming the images were reasonably well lined up, the distortion matched at the edgers of both images. It worked surprisingly well, but this is much better.
All images loaded:
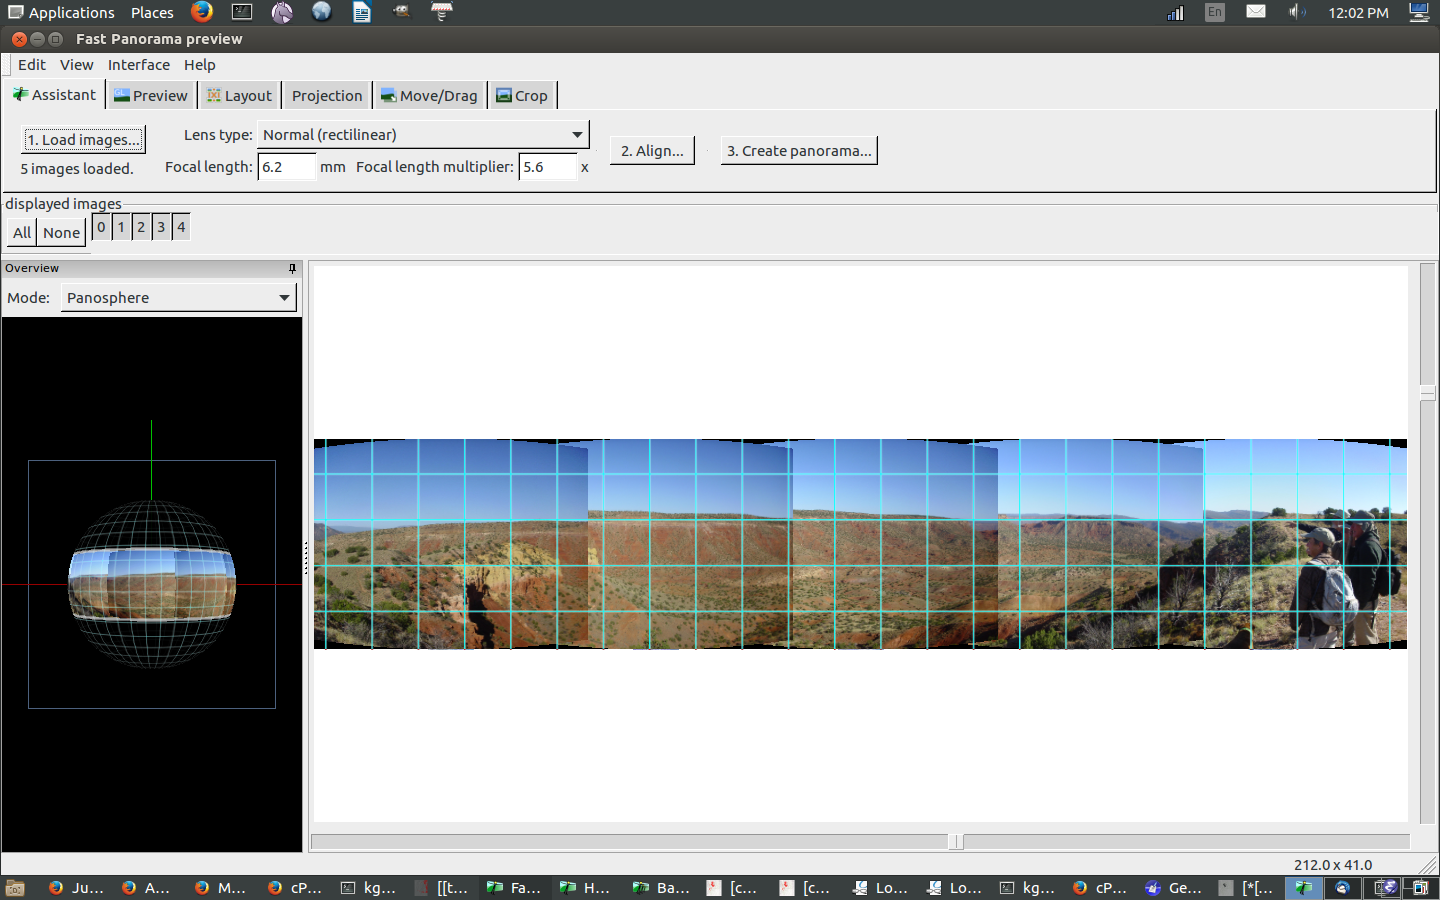
Though I haven’t experimented with it much, Hugin seems to assume that you load the images in the order left -> right and then bottom -> top. (Yes, it can handle panoramas with more than one row, and I’ve already successfully used this feature.) It uses an initial placement that makes some assumptions about how you’ve spaced the images, which seem reasonable.
Next you have to properly align the images. This step is called geometric correction, and it ends up moving and rotating the images so that they ovelap properly. This starts by identifying matching control points in each pair of images. Hugin will do this automatically for you simply by hitting the “Align” button, and it rarely misfires. If something does go wrong, you can go and pick control points yourself — which is actually a lot of fun, but, as I said, rarely necessary. You can then hit the align button and have Hugin use your control points, or you can hit the geometric correction button to carry out just that step. After geometric correction comes photometric correction; this is where I find myself having to heavily intervene. More in a moment.
After alignment:
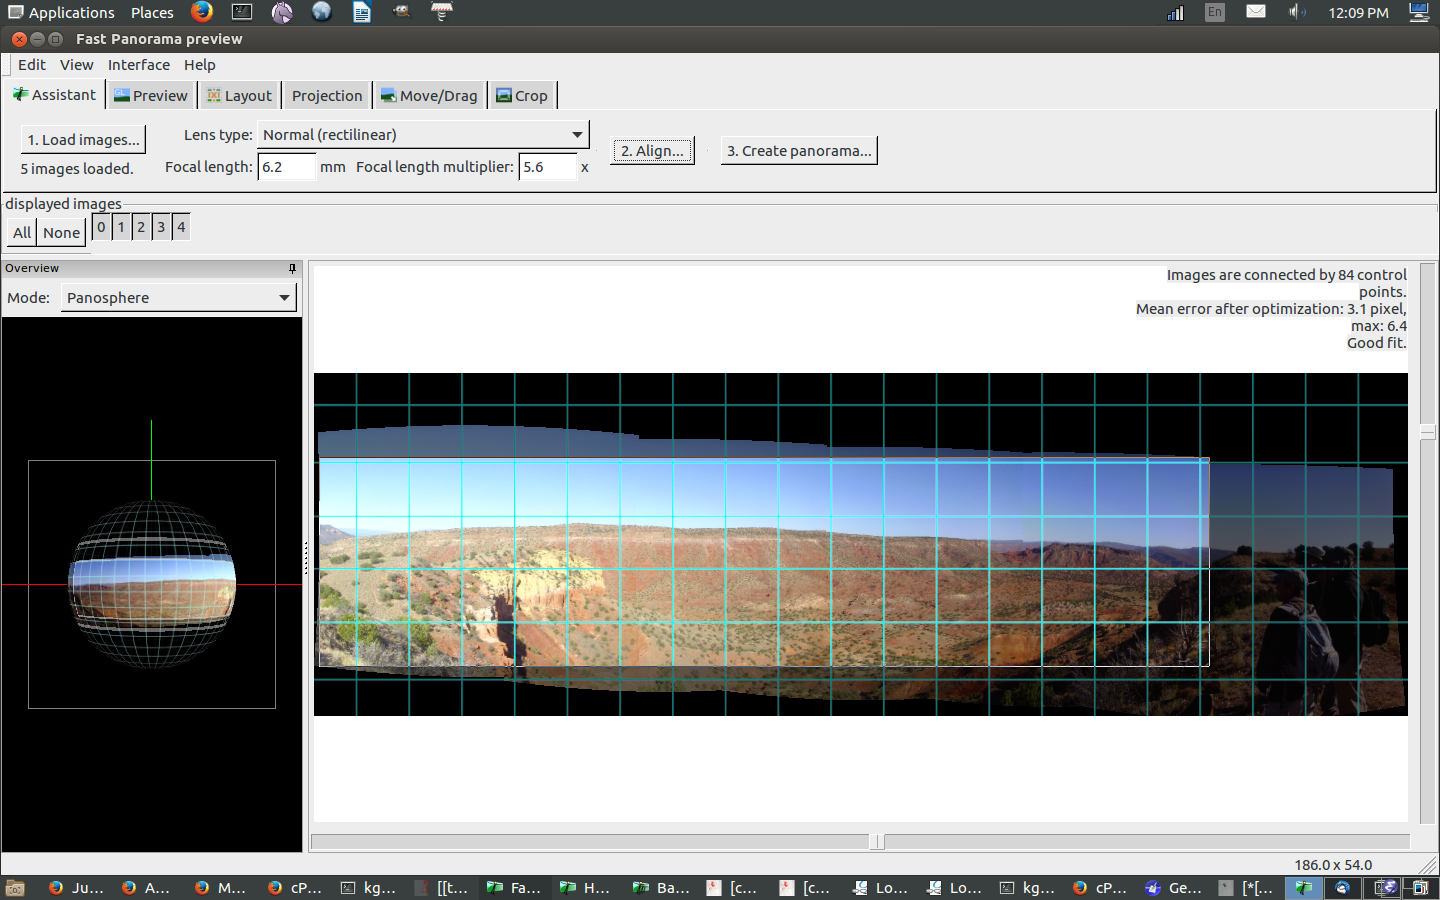
You can adjust the geometric alignment by clicking Move/Drag and dragging parts of the image around. The image sequence is “stiff” so this takes some practice to get right, but it can sometimes salvage a panorama where the pictures weren’t aligned very well. Generally speaking, “garbage in — garbage out” applies; Hugin works best with high-quality images that were well-aligned to begin with.
Alignment is most likely to be borked if the photographs were not taken from exactly the same point. If the camera shifts between images, you introduce parallax, and there’s simply no way to compensate, because the very first starting step in processing is to project all the images onto a sphere centered on the camera. If the camera moved, so that the images are on different spheres, you’re hosed. The best way to ensure this doesn’t happen is probably to use a tripod.
This particular sequence doesn’t need geometric adjustments, but Hugin has chosen to crop the image differently from what I would like, discarding a rather nice part of this pan — the awestruck geology fans enjoying the view. Fortunately, it’s easy to adjust the crop by clicking Crop and dragging the boundaries to where you want them. Thus:
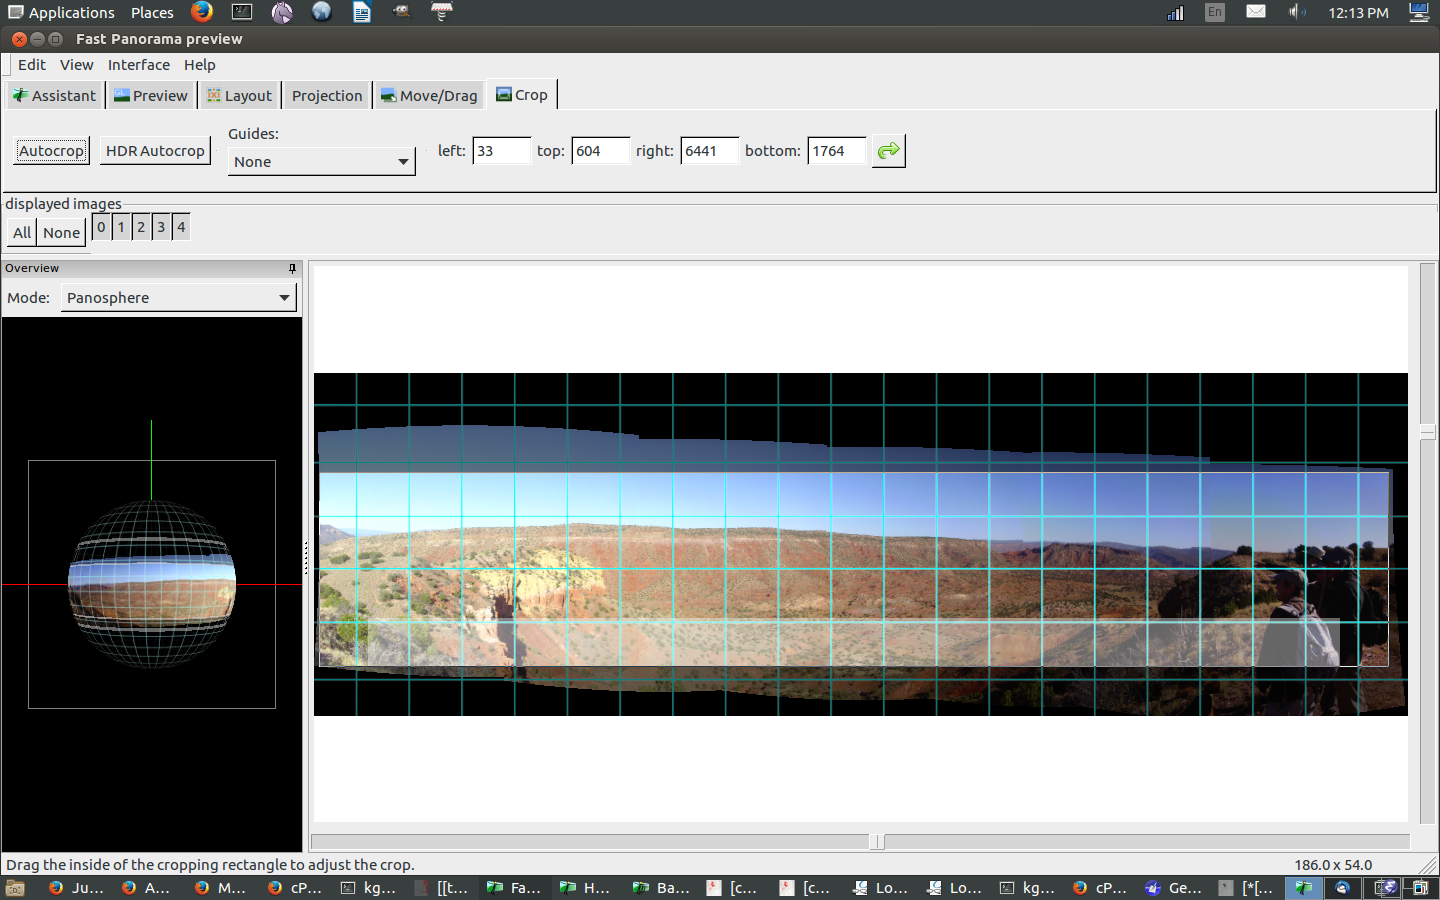
I’ve added the people by discarding some sky. A good tradeoff.
You may have noticed that the image gets progressively darker and redder from left to right. This is because Hugin has botched the photometric optimization. It may not be Hugin’s fault; the exposures here were taken with a point-and-shoot camera where I let the camera choose focus and exposure time. Apparently you’re best off taking pan images where both are fixed across all the images. Hugin looks at the exposure information in the image files and tries to compensate if they don’t match, but it doesn’t seem to get this right.
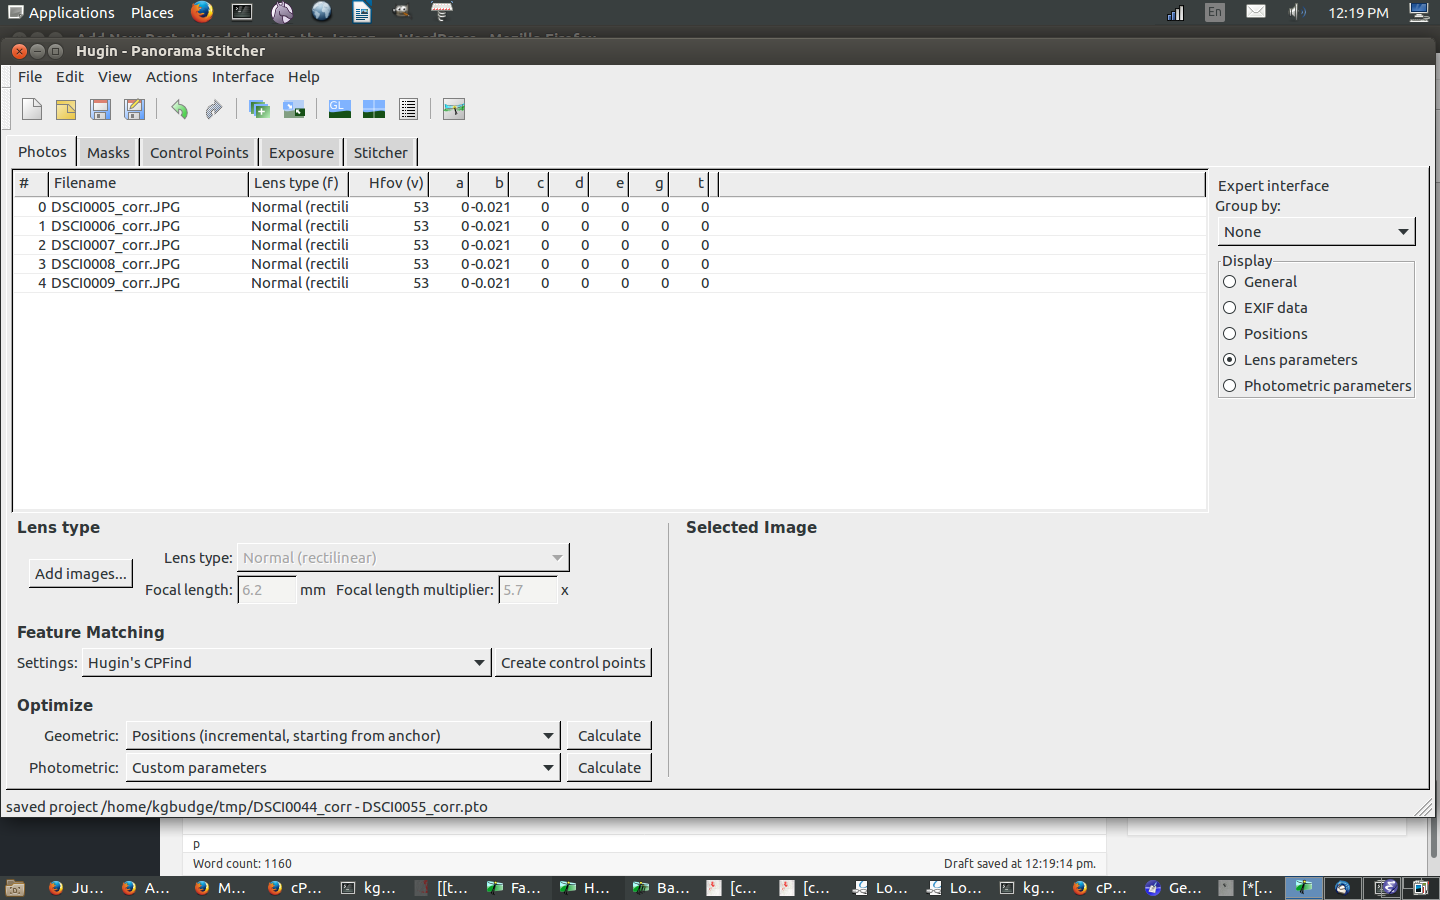
I fix this by shutting down photometric optimization completely. To do this, I turn on Expert mode, which opens a second window. I select the Photos tab and go down and change the photometric optimization from the default Low Dynamic Range to Custom. This opens an additional tab for Exposure.
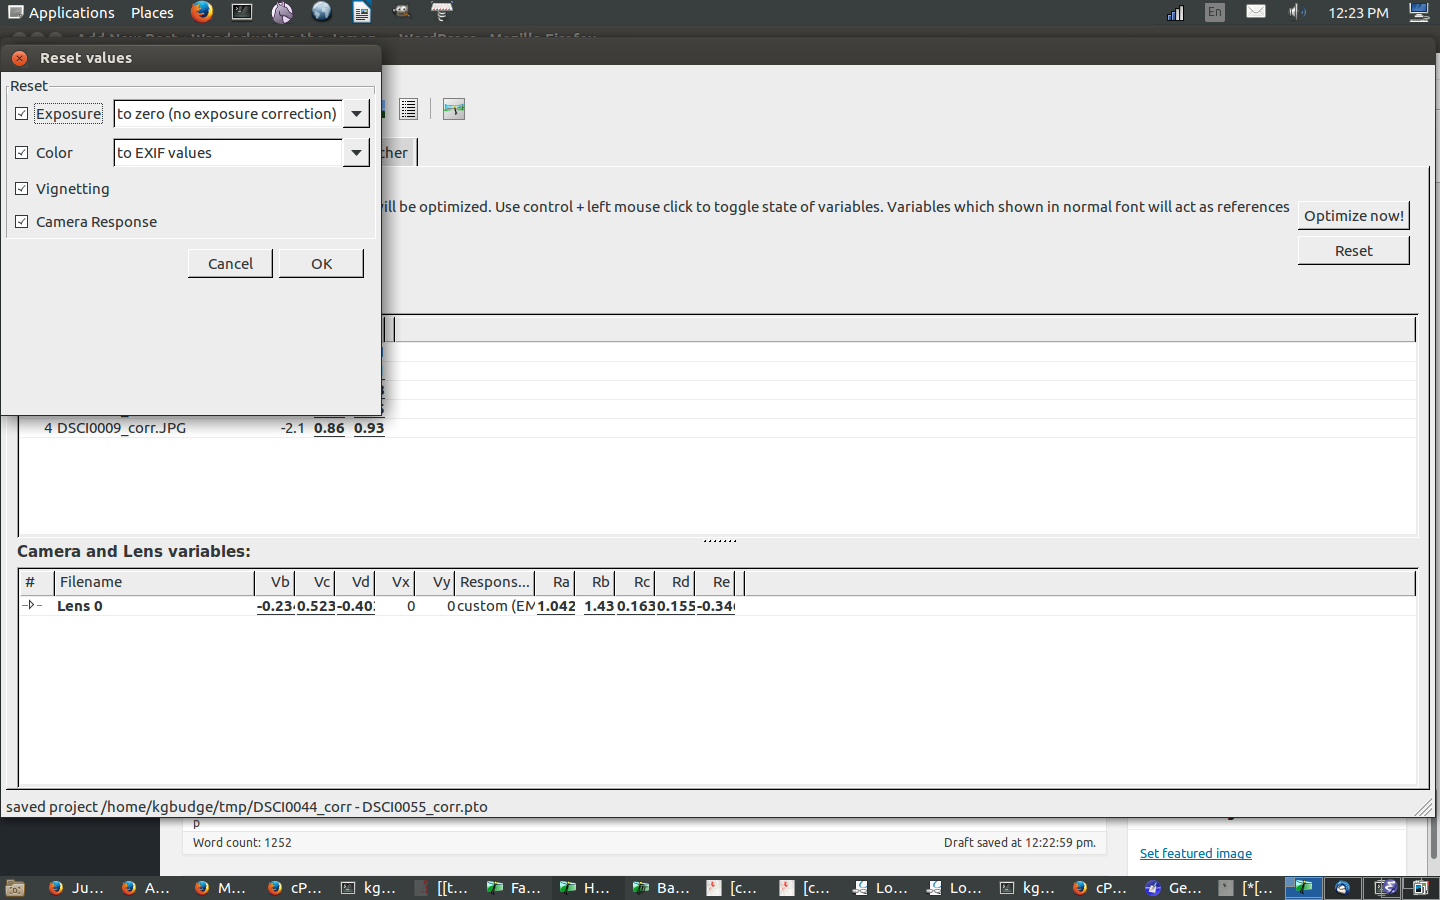
Then go into the Exposure tab, hit Reset, and change the Exposure setting in the window that pops up to “to zero (no exposure correction)”. We’re going to correct by hand, if necessary.
At this point, you can go to the Stitch tab and hit the Stitch! button and have a fair chance of coming up with a good panorama.

Not bad, but there are noticeable variations in light level. In particular, the final image is a bit bright. We go back to the Exposure tab and monkey with the EV setting for this image to get:

The other fluctuations are probably “garbage in, garbage out” features that can’t easily be compensated for. The sky is genuinely brighter from right to left because of the sun angle, so that the right side of each image is darker than the left, and this is not entirely smoothed out. Using matched exposures probably gives better results because it’s probably what the Hugin photometric optimizer is expecting.
Or perhaps not. I tried enabling the photometric optimization with the color optimization disabled, and got

Folks, I’d bet good money this is “reality”, in the sense that this is what our eyes would actually have seen if they weren’t so good at automatically compensating for changing light level as we move our gaze across a scene. Notice that the framing has completely disappeared. Problem is, this isn’t what I want; I want the effective exposure level to smoothly increase from left to right to give a uniform picture.
I suspect this requires a separate postprocessing step that Hugin does not automatically apply, but I can find no tool in the Hugin suite to do this. (I may simply have not searched long enough.) So naturally I wrote my own, and after some tweaking, I came up with:

Meh. The shadows are still too deep on the right, and on the left, the color balance is all wrong. So I next tried “leveling” the images after vignetting and before loading into Hugin.
Aaaaand …

Lesson: Massage the data enough, and it’s almost like being there. A lot of work, but good results.
Interesting post. I have been stitching panoramas with Hugin for many years. I shoot with an 8mm fisheye lens, which guarantees plenty of vignetting on every image. I have always relied on Hugin’s chosen remapper – Nona – to take care of it, and it has never let me down. It’s not occurred to me to pre-process my images for vignetting.
I think it’s possible what you’re dealing with here is varying exposure across the shots. If exposure and aperture are not locked and consistent from image to image, it’s hard to get a good blend with Hugin without some preprocessing. While your base images do show vignetting, it’s considerably less than Nona easily compensates for in my experience.
Part of it is probably varying exposure, though my impression is that Hugin is supposed to be able to somewhat compensate for that. But when I compare my experience with panoramas taken with my new, more modern camera with panoramas taken with the old one, it really seems like quality of photographic equipment matters. I haven’t had remotely the difficulty getting good panoramas out of the new camera than the old.